VueRouter原理与实现
VueRouter原理与实现
我们在平常的 Vue 项目开发中,应该都是用过 VueRouter 和 Vuex 这两个重要的插件。今天就主要研究一下 VueRouter 的是原理是什么,然后自己简单实现一个基础版本的 VueRouter。 VueRouter源码地址
原理
VueRouter的流程
VueRouter 源码中工作流程大致以下几步:
- url 发生变化
- 触发 url 监听事件
- 赋值 router 中的 current变量
- 监听 current 变量发生变化。
- 获取 current 对应的组件
- 渲染组件
看过流程也就明白了 VueRouter 是 Vue 能实现单页面应用的核心。不同的路由切换,本质上就是不同的组件切换,最后渲染在页面上。
url 监听事件
VueRouter的模式有两种hash和history。默认是hash模式。
两个模式的获取值以及对应的监听事件是不是一样的:模式 获取方式 监听事件 表示形式 hashlocation.hashhashchangehttp://localhost/#/indexhistorylocation.pathnamepopstatehttp://localhost/index实现
明白了基本的原理之后,就可以下手了。当然只是明白原理还不够,还需要明白
Vue的几个工具概念。前置技术介绍
主要介绍使用的几个主要的技术,
Vue插件,Vue混入 (mixin), 渲染函数。对这些都熟悉的大佬可以跳过。Vue插件简介
前面说过VueRouter是Vue的核心插件之一。那我们就得知道什么是Vue插件,在Vue官方文档中有相关介绍:具体介绍移步 这里插件通常用来为 Vue 添加全局功能。插件的功能范围没有严格的限制——一般有下面几种:
- 添加全局方法或者 property。如:
vue-custom-element - 添加全局资源:指令/过滤器/过渡等。如
vue-touch - 通过全局混入来添加一些组件选项。如
vue-router - 添加 Vue 实例方法,通过把它们添加到
Vue.prototype上实现。 - 一个库,提供自己的 API,同时提供上面提到的一个或多个功能。如
vue-router
- 添加全局方法或者 property。如:
开发插件
Vue插件应该暴露一个install方法。这个方法的第一个参数是Vue构造器,第二个参数是一个可选的选项对象:MyPlugin.install = function (Vue, options) {
// 1. 添加全局方法或 property
Vue.myGlobalMethod = function () {
// 逻辑...
}
// 2. 添加全局资源
Vue.directive('my-directive', {
bind (el, binding, vnode, oldVnode) {
// 逻辑...
}
...
})
// 3. 注入组件选项
Vue.mixin({
created: function () {
// 逻辑...
}
...
})
// 4. 添加实例方法
Vue.prototype.$myMethod = function (methodOptions) {
// 逻辑...
}
}使用插件
通过全局方法Vue.use()使用插件。它需要在你调用new Vue()启动应用之前完成:// 调用 MyPlugin.install(Vue)
Vue.use(MyPlugin)
new Vue({
// ...组件选项
})Vue混入 (mixin)简介
在上面的Vue插件开发中,install里面有个vue.mixin方法。这个是Vue提供的一个全局Api , 通过混入,可以把方法和变量混入Vue的示例中,具体看文档 这里使用
混入的对象以及属性的内容是和Vue组件一致,可以混入数据,方法,甚至是生命周期。而对于同名的属性和方法,Vue会进行合并,后出现的属性会覆盖之前的属性和方法。 全局混入会影响每一个之后创建的Vue实例。MyPlugin.install = function(vue) {
vue.mixin({
data() {
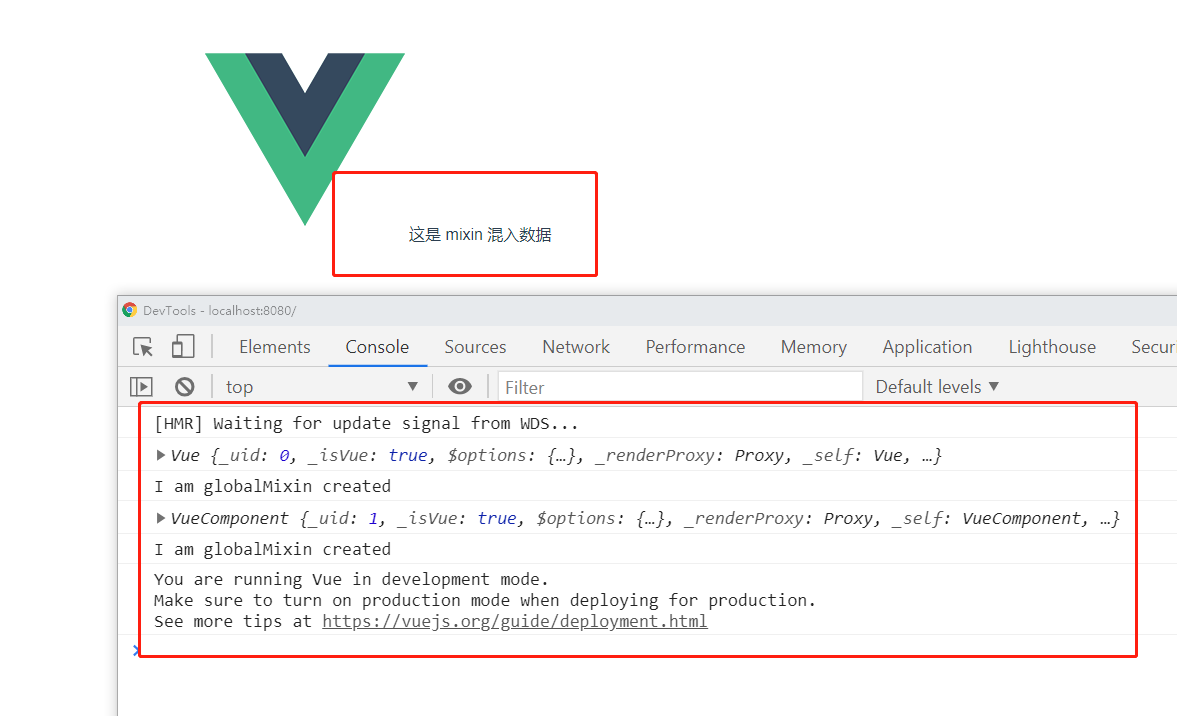
return {globalMixinData: '这是 mixin 混入数据'}
},
// 混入生命周期
created() {
console.log(this)
console.log('I am globalMixin created');
}
})
}
//使用拆件
Vue.use(MyPlugin)
new Vue({
render: h => h(App),
}).$mount('#app')在
main.js中引入MyPlugin然后在App.vue中引用{{globalMixinData}}即可看到
图中执行两次console.log(I am globalMixin created)是因为new Vue和App.vue都会执行一次生命周期。 通过console.log(this)是能看到哪个执行的生命周期。渲染函数 (h == createElement)
简介
渲染函数的由来是因为
Vue使用了 虚拟DOM,更新操作 虚拟DOM 比操作真正的DOM要更快,而且更节省资源。 渲染函数 createElement 实际上返回的是一个VNode虚拟节点,最后Vue再生成真实的DOM显示在页面上。参数
// @returns {VNode}
createElement(
  // {String | Object | Function}
  // 一个 HTML 标签名、组件选项对象,或者
  // resolve 了上述任何一种的一个 async 函数。必填项。
  'div',

  // {Object}
  // 一个与模板中 attribute 对应的数据对象。可选。
  {
    // (详情见下一节)
  },

  // {String | Array}
  // 子级虚拟节点 (VNodes),由 `createElement()` 构建而成,
  // 也可以使用字符串来生成“文本虚拟节点”。可选。
  [
    '先写一些文字',
    createElement('h1', '一则头条'),
    createElement(MyComponent, {
      props: {
        someProp: 'foobar'
      }
    })
  ]
)
第二个参数内容部分如下: 详细参数 。
 {
      // 普通的 HTML attribute
      attrs: {
        id: 'foo'
      },
      // 组件 prop
      props: {
        myProp: 'bar'
      },
      // 事件监听器在 `on` 内,
      // 但不再支持如 `v-on:keyup.enter` 这样的修饰器。
      // 需要在处理函数中手动检查 keyCode。
      on: {
        click: this.clickHandler
      },
      // 仅用于组件,用于监听原生事件,而不是组件内部使用
      // `vm.$emit` 触发的事件。
}
示例
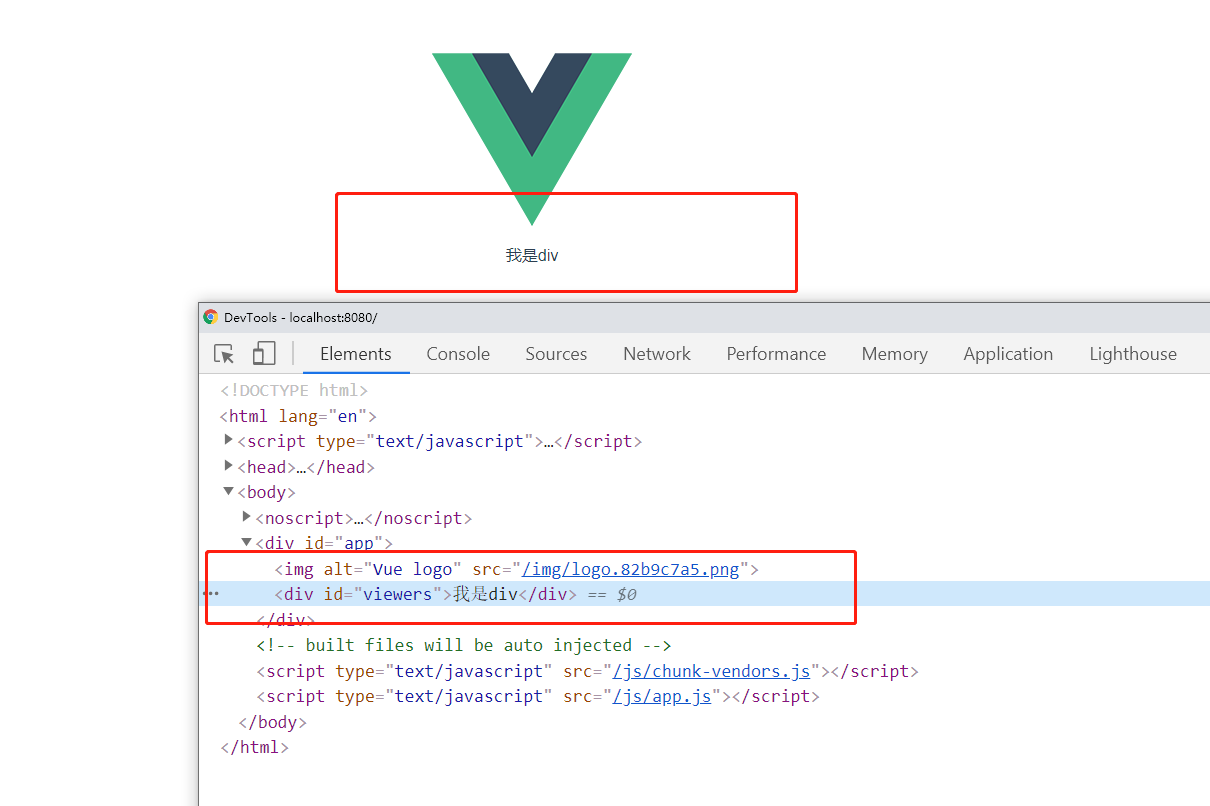
比如创建一个全局组件viewer里面的内容为<div id='viewers'>我是div</div>, 在main.js中添加代码如下:Vue.component('viewer',{
render(h){
const tag = 'div'
const config = {attrs:{id:'viewers'}}
return h(tag,config,'我是div')
}
})结果如下
基础版实现
了解前面的知识之后,就能真正开始写了。
history 路径监听类
因为VueRouter是分hash和history两种模式,那么我们分别创建两种类:HashHistory/**
* hash类型
*/
class HashHistory {
constructor() {
this.current = null;
this.initListener()
}
initListener (){
location.hash ? '' : location.hash = '/';
window.addEventListener('load', () => {
// 页面加载的时候初始化,存储hash值到history的current上,并且去掉开头的#
this.current = location.hash.slice('1');
});
window.addEventListener('hashchange', () => {
// hash改变的时候更新history的current
this.current = location.hash.slice('1');
})
}
}HTML5History/**
* history模式
*/
class HTML5History {
constructor() {
this.current = null;
this.initListener()
}
initListener (){
// 如果url没有pathname,给一个默认的根目录pathname
location.pathname ? '' : location.pathname = '/';
window.addEventListener('load', () => {
// 页面加载的时候初始化,存储pathname值到history的current上
this.current = location.pathname;
});
window.addEventListener('popstate', () => {
// pathname改变的时候更新history的current
this.current = location.pathname;
})
}
}这两个类相同,主要做了两件事, 一是记录当前的 路径地址
current,一个是创建监听路径变化事件。initListener()。只是两个监听的事件名不一样。CustomRouter路由类//定义路由类
class CustomRouter {
constructor(options) {
this.mode = options.mode || 'hash';
this.routers = options.routers || [];
// 将数组结构的routes转化成一个更好查找的对象
this.routesMap = this.mapRoutes(this.routers);
this.init();
}
// 初始化history
init() {
if (this.mode === 'hash') {
this.history = new HashHistory()
} else {
this.history = new HTML5History()
}
}
/*
将 [{path: '/', component: Hello}]
转化为 {'/': Hello} 方便查找
*/
mapRoutes(routes) {
return routes.reduce((res, current) => {
res[current.path] = current.component;
return res;
}, {})
}
}CustomRouter有两个参数:1.mode类型,默认为hash2.routers路由数组。因为是以插件的形式给Vue因此,还需要提供一个install方法// 添加install属性,用来执行插件
CustomRouter.install = function (vue) {
vue.mixin({
beforeCreate() {
// 获取new Vue时传入的参数
if (this.$options && this.$options.router) {
this._root = this;
this._router = this.$options.router;
// 监听current, defineReactive(obj, key, val)不传第三个参数,第三个参数默认是obj[key]
// 第三个参数传了也会被监听,效果相当于,第一个参数的子级
vue.util.defineReactive(this, 'current', this._router.history);
// vue.set(this, 'current', this._router.history);
} else {
// 如果不是根组件,就往上找
this._root = this.$parent && this.$parent._root || this ;
}
// 暴露一个只读的$router
Object.defineProperty(this, '$router', {
get() {
return this._root._router;
}
})
}
});
// 注册 router-link组件,进行路由跳转
vue.component('router-link', {
props:['to'],
render(h) {
const tag = 'a' // a 标签
const config = {
attrs:{
href:this._self._root._router.mode =='hash'? '#'+this.to: this.to // 根据路由mode 设置不同的 href 属性
}
}
return h(tag,config,this.$slots.default);
}
})
// 注册router-view组件,这个组件根据current不同会render不同的组件
vue.component('router-view', {
render(h) {
//获取当前的path路径
const current = this._self._root._router.history.current;
//获取转换后的路由对象 {`path`:`component`} 组合
const routesMap = this._self._root._router.routesMap;
//根据path 获取对应的组件
const component = routesMap[current];
//渲染组件
return h(component);
}
})
}代码中使用了
Vue.mixin在生命周期beforeCreate来混入路由对象,同时暴露出一个$router来获取路由对象,然后利用了 渲染函数 注册了两个全局组件router-view和router-link有同学会注意到有个
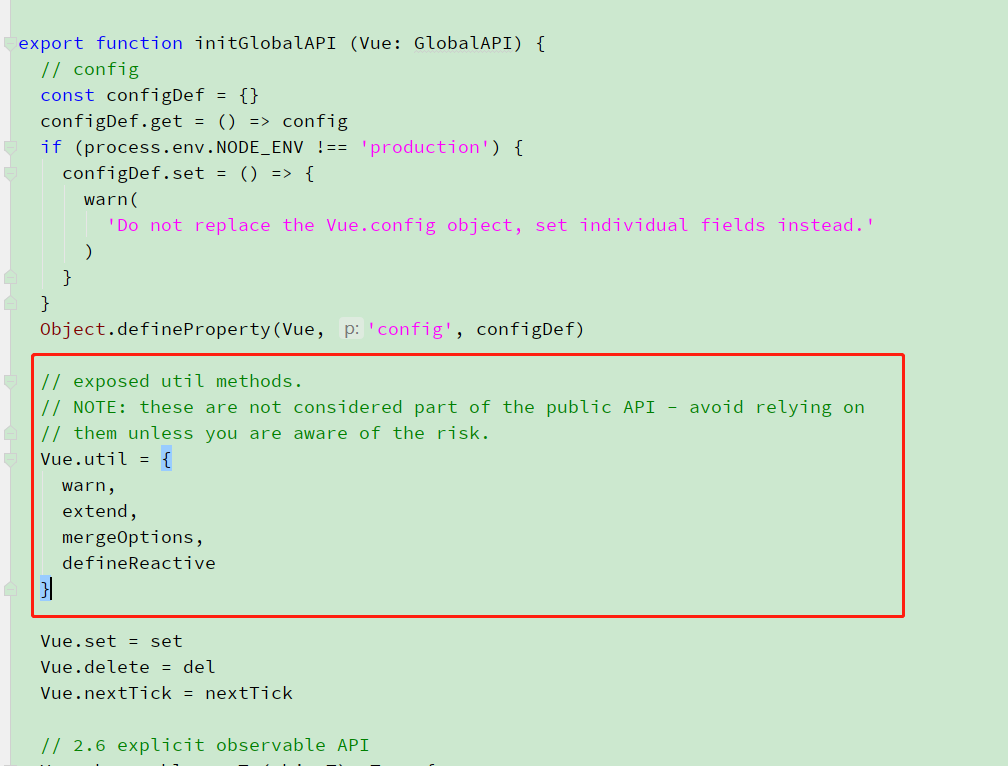
vue.util.defineReactive(this, 'current', this._router.history);。这行代码主要是让current属性为响应式。Vue.util是没有在文档写出的。源码中可以看到定义
Demo使用
有了自定义路由之后,就可以使用了。
先写两个路由数组,定义路由。
import CustomRouter from "../customRouter";
import Vue from 'vue'

import HelloWorld from '../components/HelloWorld.vue'
import Test from '../components/Test'

//使用路由插件
Vue.use(CustomRouter)

const  routers = [
    {
        path:'/home',
        component: HelloWorld
    },
    {
        path: '/test',
        component: Test
    }
]
const router  = new CustomRouter({
    mode:'history', //默认为 hash
    routers
})
export default router
在
main.js引用,然后在App.vue使用<template>
<div id="app">
<img alt="Vue logo" src="./assets/logo.png">
<div class="router-link-box">
<router-link to="/home">Hello World</router-link>
<router-link to="/test">Test</router-link>
</div>
<router-view></router-view>
</div>
</template>hash模式结果:
history模式结果:
总结
OK,总算是写完了。
VueRouter的核心原理如果仔细看完上面的,应该是明白的。上面的代码可以在 github 获取。地址 。音乐小憩

- 微信
- 支付宝